How we monitor bandwidth usage in pfsense?
There are several methods for monitoring bandwidth usage,
with different levels of granularity.
• 1 pftop
• 2
trafshow
• 3
Built-in Graphs
• 4
BandwidthD
• 5
Darkstat
• 6 NTOP
• 7 Monitoring
on Multiple Interfaces
• 8 Netflow
• 9 vnstat
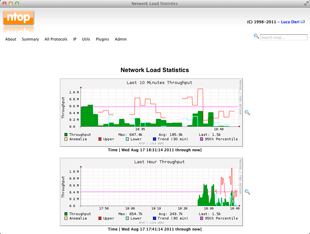
Now we discuss here about ntop.
Ntop
ntop is a network probe that shows network usage in a way
similar to what top does for processes.ntop is based on libpcap and it has been written in a portable way in
order to virtually run on every Unix platform. If you need even more detail
than that, you might need the ntop
package,(Ntop Package:
What is ntop? Ntop is a network probe that shows network
usage in a way similar to what top does for processes. In interactive mode, it
displays the network status on the user’s terminal. In web mode it act as a web
proxy server, creating an HTML dump of the network
Ntop is a most important tool.
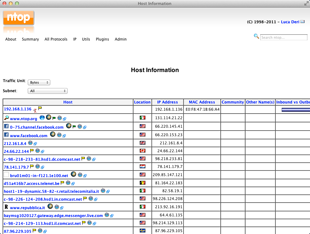
Go to the diagnose tab and select ntop
When we type LAN IP address of PFSense on browser it is
necessary to add colon and 3000 port number for opening the ntop. Like as
192.168.0.2:3000
This address automatically redirect on this URL.
http://192.168.0.2:3000/sortDataIP.html
which can also be found under System > Packages. It can
break down detail by IP, protocol, and so on. Once installed, it appears under
Diagnostics > ntop. It will even track where connections were made by local
PCs, and how much bandwidth was used on individual connections.

Ntop do something special for every ntop user. that given
below.
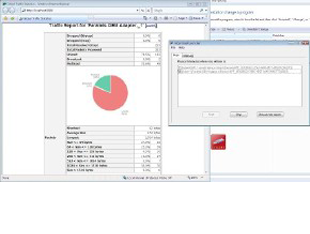
• Sort
network traffic according to many protocols
• Show
network traffic sorted according to various criteria
• Display
traffic statistics
• Store on
disk persistent traffic statistics in RRD format
• Identify
the indentity (e.g. email address) of computer users
• Passively
(i.e. without sending probe packets) identify the host OS
• Show IP
traffic distribution among the various protocols
• Analyse
IP traffic and sort it according to the source/destination
• Display
IP Traffic Subnet matrix (who’s talking to who?)
• Report IP
protocol usage sorted by protocol type
• Act as a
NetFlow /sFlow collector for flows generated by routers (e.g. Cisco and
Juniper) or switches (e.g. Foundry Networks)
• Produce
RMON-like network traffic statistics


