Tuesday, 12 May 2015

Traffic Shaping In PFsense


Traffic Shaping:

We can define traffic shaping by two ways.      1: By interface 2:By Single User 
Traffic shaping by interface: By Interface

Traffic shaping by single user: Limiter
We can control bandwidth usage per client with adding download and upload limit. For controlling bandwidth we need to follow these simple steps

1-      Select Limiter option under firewall tab.
2-      Hit on “+” sign create new limiter
3-      Fill some fields and enable this rule. Like as Click on enable switch then add name as Download or upload after that we need to add bandwidth in kb/s or Mb/s etc. we can add description here too.
4-      Save and apply changes

Layer 7 Rule: Layer 7 filtering or shaping is identifying traffic at layer 7 of the OSI model. Some time we cal layer 7 as Deep Packet Inspection (DPI).
In TCP/IP, the application layer contains the communications protocols and interface methods used in peer-to-peer communications across an Internet Protocol computer network.
So let see the settings in PFSense about Layer 7 

1-      Select Traffic shaper option Under Firewall tab then select Layer 7 option.
2-      Hit “+” sign to create new layer 7 rule.
3-      First Enable this rule by adding check box then add name after that we can add description too
4-      Add rule here by clicking on “+” sign. Add Protocol, structure and Behavior
5-      Save and Apply Setting

We can add more here by hitting on + sign. More other ports, etc
After adding Layer 7 Rule we need to go firewall section to add layer 7 setting in option Rule under Firewall Tab.

1-      Select option rule under firewall tab and find out layer 7 option
2-      Pull down layer 7 option and select created layer 7 rule.
3-      Save and apply settings.

Wednesday, 6 May 2015

Port Forwarding


Port Forwarding:

Port Forwarding means to forward request through a specific port to the required Destination called port forwarding.
We can explain port forwarding with a reliable example.
If you want to remote any system that outside from your network then you can select MSRDP port and target our request to the destination with public source Interface.
According to the Pfsense I can explain with little bit description and print screen that will help to solve your port forwarding issue quickly. Follow instruction step by step.

1-      First we need to select  NAT option under Firewall tab.
2-      Add rule here after hitting on “+” sign
3-      In this  page we will add
     Interface(WAN interface)
     Protocol(TCP/UDP)
     Destination(any)
     Destination Port Range(From: MS RDP       TO: MS RDP)
     Redirect Target IP ( Machine Ip that we want to Access)
     Redirect Target Port( MS RDP)
     Save and Apply changes
That’s all for port  fording in PFSense. I attaché here print screen for more help.
If we have multi wan in network then we can add more rules under firewall tab NAT option. This way we can reduce the down time .

Thursday, 15 May 2014

Live PFsense Technical Support For Free

Dear Blog Readers,

We will be providing remote PFsense Technical Support for free this Sunday (18.5.2014). We will be using remote software like Teamviewer or Remote Desktop. Interested people should register here.

Thanks,
-Jonah

Tuesday, 18 February 2014

PFsense Package For Bandwidth Monitoring - Ntop Installation Guide

 Ntop Installation Guide:

As far as my experience is concerned. I have been using ntop for over an year now. It works really fine with reasonable statistics. Installation Guide.

1- Open Pfsense Web Interface
2-Navigate to System Tab
3-Select Packages
4-Click Available Packages
5-Search ntop
6-Click Install

And you're done.

Monday, 13 May 2013

Question and Answer

PFsense Questions and Answers.

1-    How do you setup Ntop On pfsense? I try setting it up but everytime I go to http://xxx.x.x.xx:3000/ I get "The connection has timed out" ?

Ans:   You can setup in a very easy way.Print screen given below.
Go to diagnostic tab and select ntop setting option then you can see an other page. That page is given below.
Add here ntop password and retype same password and select interface then save changes.
Then u can access ntop from second tab "Access ntop" then u can see given below page.


Note: After setup ntop password you can access ntop from Diagnostic tab and ntop option.

---------------------------_______________________________--------------------------------

2-  How to remove local host from pfsense that resolve domain as a local DNS ? 

Ans:  In a pfsense local host work as a local DNS if u want that local serve ip not work as a local DNS then  
 save some changes like as

---------------------------_______________________________--------------------------------


3- How to Change web Login interface password ?
Ans: It is very easy to Change the web login password.we need to go User Manager option under System Tab.here we can add password.print screen attach here


---------------------------_______________________________--------------------------------


Friday, 4 January 2013

Bandwidth Usage Probe


How we monitor bandwidth usage in pfsense?
There are several methods for monitoring bandwidth usage, with different levels of granularity.
•             1 pftop
•             2 trafshow
•             3 Built-in Graphs
•             4 BandwidthD
•             5 Darkstat
•             6 NTOP
•             7 Monitoring on Multiple Interfaces
•             8 Netflow
•             9 vnstat
Now we discuss here about ntop.
Ntop
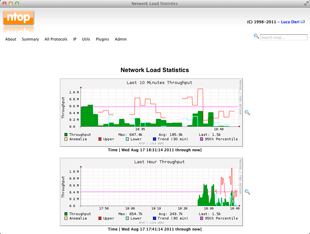
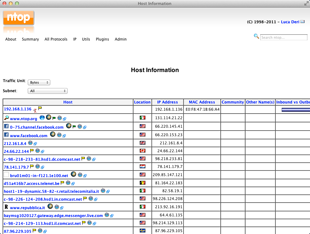
ntop is a network probe that shows network usage in a way similar to what top does for processes.ntop is based on libpcap  and it has been written in a portable way in order to virtually run on every Unix platform. If you need even more detail than that, you might need the ntop  package,(Ntop Package:
What is ntop? Ntop is a network probe that shows network usage in a way similar to what top does for processes. In interactive mode, it displays the network status on the user’s terminal. In web mode it act as a web proxy server, creating an HTML dump of the network
Ntop is a most important tool.
Go to the diagnose tab and select ntop
When we type LAN IP address of PFSense on browser it is necessary to add colon and 3000 port number for opening the ntop. Like as

192.168.0.2:3000
This address automatically redirect on this URL.
http://192.168.0.2:3000/sortDataIP.html


which can also be found under System > Packages. It can break down detail by IP, protocol, and so on. Once installed, it appears under Diagnostics > ntop. It will even track where connections were made by local PCs, and how much bandwidth was used on individual connections.


Ntop do something special for every ntop user. that given below.
•             Sort network traffic according to many protocols
•             Show network traffic sorted according to various criteria
•             Display traffic statistics
•             Store on disk persistent traffic statistics in RRD format
•             Identify the indentity (e.g. email address) of computer users
•             Passively (i.e. without sending probe packets) identify the host OS
•             Show IP traffic distribution among the various protocols
•             Analyse IP traffic and sort it according to the source/destination
•             Display IP Traffic Subnet matrix (who’s talking to who?)
•             Report IP protocol usage sorted by protocol type
•             Act as a NetFlow /sFlow collector for flows generated by routers (e.g. Cisco and Juniper) or switches (e.g. Foundry Networks)
•             Produce RMON-like network traffic statistics

PFSense Solutions